Setup and Installation Guide for Desktop POS Machines
Implementing a desktop POS machine is a crucial step for businesses looking to streamline their operations, manage inventory efficiently, and improve transaction speed. Proper setup and installation ensure that the system functions reliably, minimizes errors, and provides a smooth experience for both employees and customers. This guide provides a step-by-step overview of setting up a desktop POS machine, highlighting essential considerations for optimal performance.
Understanding the Desktop POS Machine
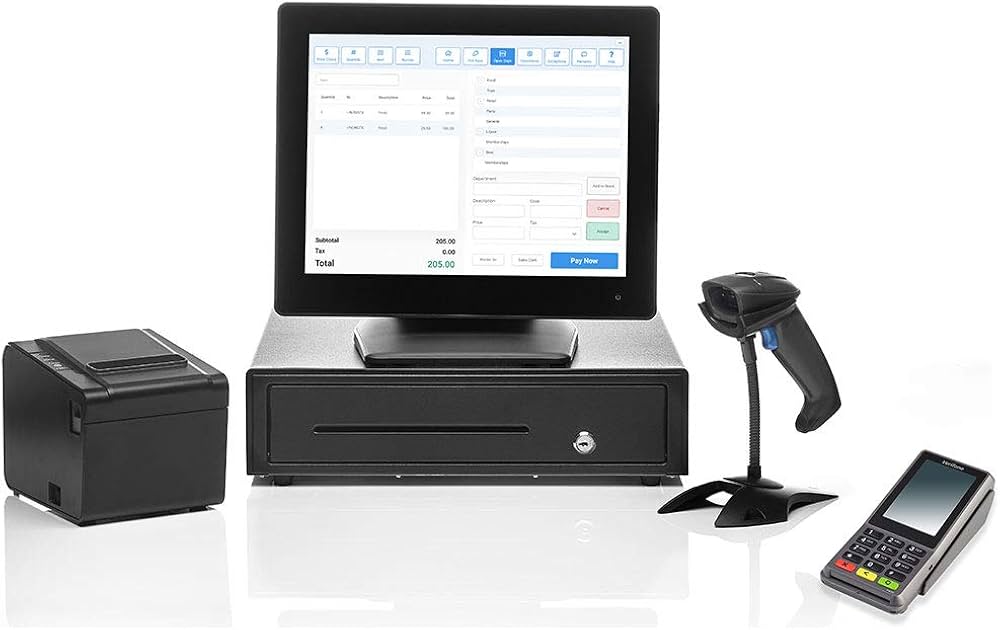
A desktop POS machine is a stationary, all-in-one system designed to handle sales transactions, inventory management, and reporting. It typically includes a touchscreen or monitor, a central processing unit (CPU), a cash drawer, a barcode scanner, a receipt printer, and payment terminals. A professional Desktop POS Machine integrates these components with POS software to create a seamless operational platform. Proper installation ensures that hardware and software components communicate effectively, providing real-time updates and accurate data for business operations.
Step 1: Planning the Setup
Before installing a desktop POS machine, careful planning is essential. Begin by identifying the optimal location for the terminal. The system should be placed on a stable counter with adequate space for peripherals such as printers, cash drawers, and barcode scanners. Ensure that the location provides easy access for staff while remaining secure from customer interference or potential theft. Additionally, confirm that power outlets and network connections are available and positioned conveniently for all hardware components.
Step 2: Hardware Assembly
The next step involves assembling the hardware components. Connect the monitor or touchscreen to the CPU, attach the barcode scanner, and position the cash drawer securely. Connect the receipt printer and payment terminal according to the manufacturer’s instructions. Ensure that cables are organized to prevent tangling or obstruction. Proper assembly minimizes the risk of hardware malfunctions and ensures that all components function efficiently.
Step 3: Software Installation
Once the hardware is assembled, install the POS software on the desktop POS machine. Most modern POS systems come with an installation wizard that guides users through the setup process. During installation, you will configure essential settings such as tax rates, currency, and business details. Connect the software to peripherals like barcode scanners and receipt printers to ensure smooth communication. Updating the software to the latest version is recommended to access new features and security enhancements.
Step 4: Network and Cloud Configuration
If your desktop POS machine supports cloud integration or networked systems, configure the network connection during setup. Connect the system to a stable Wi-Fi or Ethernet network to enable real-time data synchronization, remote access, and centralized reporting. For businesses with multiple locations, ensure that all terminals are connected to the same network or cloud system to maintain consistent inventory and sales data across outlets.
Step 5: User Account Setup and Permissions
A critical part of setup is creating user accounts for employees and assigning appropriate access levels. Desktop POS machines allow administrators to set role-based permissions, limiting access to sensitive functions such as refunds, voided transactions, or inventory adjustments. Assign unique usernames and passwords or configure biometric authentication if supported. Proper user management enhances security and reduces the risk of unauthorized access or internal errors.
Step 6: Data Import and Inventory Configuration
Next, import existing product and customer data into the POS system. Configure inventory categories, pricing, and stock levels to ensure accurate tracking. Many POS systems allow bulk import using CSV files, simplifying the process for businesses with extensive product catalogs. Set up low-stock alerts and reorder thresholds to automate inventory management and reduce the risk of stockouts.
Step 7: Testing and Calibration
Before going live, test the desktop POS machine thoroughly. Process sample transactions to ensure that payments, receipts, and inventory updates function correctly. Verify that barcode scanners read products accurately and that printers generate clear receipts. Test network connections and cloud synchronization to confirm real-time data updates. Calibration and testing help identify potential issues early, ensuring smooth operations once the system is operational.
Step 8: Employee Training
Proper training is essential for maximizing the efficiency of a desktop POS machine. Train staff on key functions, including processing transactions, managing inventory, handling refunds, and generating reports. Provide guidance on troubleshooting common issues and emphasize security practices such as logging out when not in use. Well-trained employees can leverage the system’s full capabilities, reducing errors and improving service quality.
Conclusion
Setting up and installing a desktop POS machine is a structured process that involves planning, hardware assembly, software configuration, network setup, and employee training. Following these steps ensures that the system operates efficiently, maintains accurate data, and enhances overall business operations. A properly installed desktop POS machine not only streamlines transactions but also improves inventory management, reporting, and customer service, making it an essential investment for modern businesses.